DIGGING A SIMPLE WELL
Digging a water well is not a complicated procedure. Early wells or those dug by pioneers, were relatively shallow holes or pits. These were placed near lakes, streams or springs. The purification or filtering was done by sand or simply the surrounding earth. Water that entered the well had to pass through the ground first. Some filtering, a little micro biotic action and you had clean, tasty water. However, these shallow pits had their drawbacks. They were susceptible to contamination from surface water and were only suitable for low water production. Deeper wells happened by need. As a shallow well ran out of water, it had to be dug deeper, then the earthen sides would start to cave in. The whole idea had to be reworked. This led to medium depth wells with circular fitted rock sides. These were still dug by hand but as the depth increased, hazard to life and limb became a problem.
A mixture of hand / machine drilling methods were developed where the operator stayed above ground. Finally machine drilled walls using a variety of drill bits to suit varying ground conditions was created.
Almost all walls require a well casing. This stops the sides from collapsing and keeps the well contamination free.
For our purposes we will focus on simple shallow wells. Typically dug by hand, but the use of machinery (excavators) speeds things up considerably.
This type of shallow well is positioned to take advantage of natural drainages, springs and high water tables and is not suitable for deep applications.
Location of Surface Water
We are looking for water close or at least somewhat close to the surface of the ground. This is where nature can be our greatest ally. Besides the obvious natural ravines, dips and gullies, you should also be looking for the type of vegetation growing in the area. This will be the real tip off.
When you find reeds, cat tails, cotton wood trees, willows or other water loving varieties of plant life growing in patches (or localized in one spot) you have found a probable good location for a simple well. Digging test holes or pits would be the next step. The alternate to this is to dig one large pit that HAS to capture any water in the area.
The key element here is "pressure differential". When you dig or start to dig a shallow well you are creating a low pressure location for water to accumulate. This is the same way perforated drain pipes work. Water will be naturally drawn to a depression or hole because it is the path of least resistance.
If you are going to dig test holes, wait one day and then check those locations for water. The holes should be at least 12" - 24" deep.
If you have decided to dig one large pit or well the approach is a little different. The dug location should be at least 36" deep and 36" or more across. Remember we are trying to capture or draw water into the start of our well. At this point you may notice a trickle of water entering your pit. [Mark that location!] If the water's entry isn't obvious you will have to check your "digs" every hour or so. You are looking for the location (entrance) of water.
If the well just seems wet with no obvious entry point you will need to over dig the depth of the spot to create a holding reservoir.
Pathway of Water into your Well
If the water enters from the side of the well.
1) Continue digging to a depth of 6 feet or more.
2) Shore up the sides of your well as you dig. You can use 2" x 6" or 2" x 8" lumber to temporarily hold the sides or walls back. Remember you are making a water reservoir to draw water from.
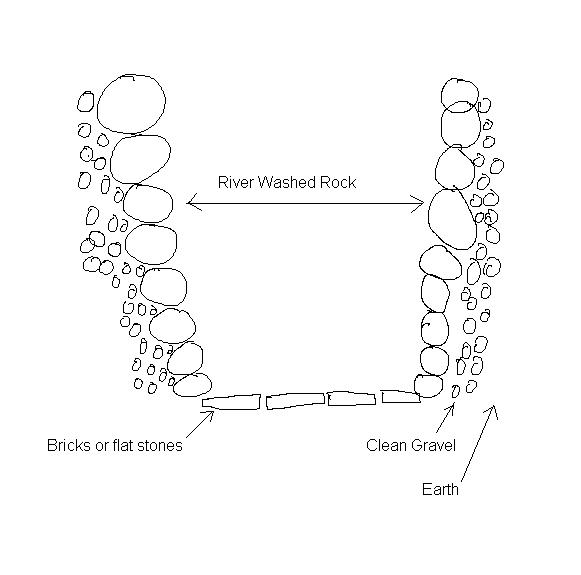
3) When you have reached your chosen target depth, you should continue and over dig the center of the bottom and place bricks or connected flat stones as a base. It is a good idea to wash off these stones or bricks if you can.
Once the base is finished, carefully remove the bottom 2" x 6" or 2" x 8" braces. Some soil will sluff in. Using large river washed rocks sized from 6" to 18" build a circle which will form the first bottom row of your well casing. If possible, backfill behind the rocks with coarse gravel. This will support the outer wall of the well and allow drainage water flow to fill the pit.
Continue with this ring of large rocks until you reach the top of the well. It is preferred that you taper the rock wall casing. Have it smaller at the bottom and slightly larger at the top. This method of construction is two dimensional in approach. Reinforcement around the perimeter of the wall casing and tapered for vertical stability.
If the Water Enters from the Bottom of the Well
In this case you want to encourage the water to enter from the bottom. Dig the pit as usual, but, instead of using flat stones on the bottom, use washed river sand and then coarse gravel. This filters incoming water while remaining porous for easy water flow.
The construction of the walls of the well casing is the same as for water entering from the side of your well. Please be sure to block or guard against surface water entering your well.
Final Conditioning, Cleaning and Preparation of your Well
Take a water sample of the water before cleaning the well. Be sure to mark it as the first sample.
The you need to draw as much water as possible out of your well a total of three times. This depletion and refilling helps flush out sediments and lighter materials out of the main useable water stream.
Take another water sample and mark it "sample #2".
Now dump 2 cups of unscented chlorine bleach into your well and let it sit for 24 hours. Pump all of the water at least three more times. If chlorine can still be detected (smelled), continue flushing until the scent is gone. Be aware that if chlorine was spilled on the well casing, that may be a source of odor.
Once the scent is pretty much gone, take another sample, marking it "sample #3".
Send all three samples out to be tested for water purity. We are looking for a clean bill of health for our drinking water.
Enjoy your well!
|